1. The “Geographic” History of Molecular Detection
The term “Western Blot” is a whimsical artifact of scientific nomenclature, born from a directional pun rather than geographic origin. To understand the name, we must trace the “flow” of molecular biology’s central dogma. In 1975, Edwin Southern developed a method to detect DNA, which the community logically termed the Southern Blot. When a method for RNA detection was developed in 1977, it was playfully dubbed the Northern Blot. By the time researchers perfected protein detection in 1979 (officially named by W. Neal Burnette in 1981), “Western” was the next logical coordinate on the compass.
The relationship between these foundational techniques is defined by their molecular targets:
The Directional Naming Convention:
• Southern Blot (1975): Detection of DNA
• Northern Blot (1977): Detection of RNA
• Western Blot (1979/1981): Detection of Proteins
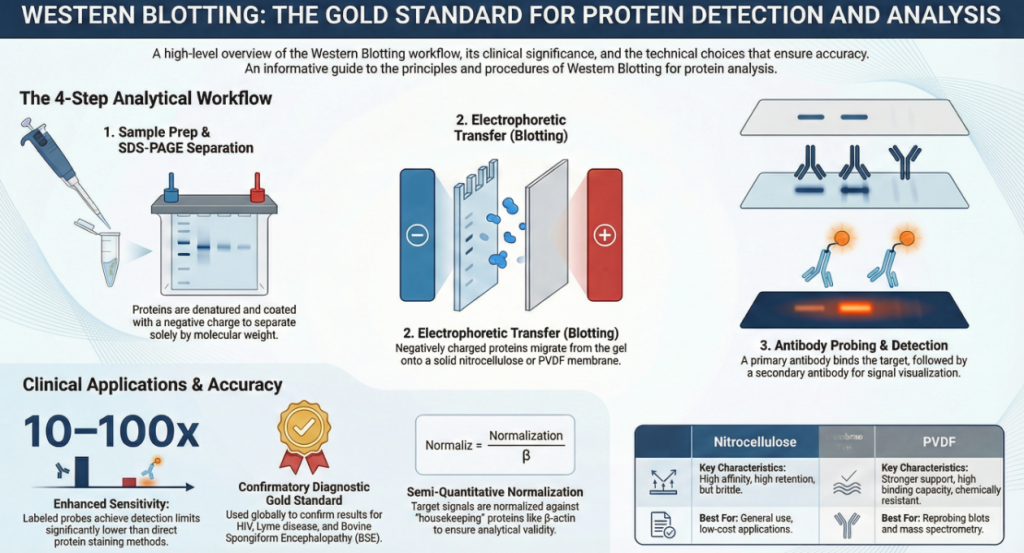
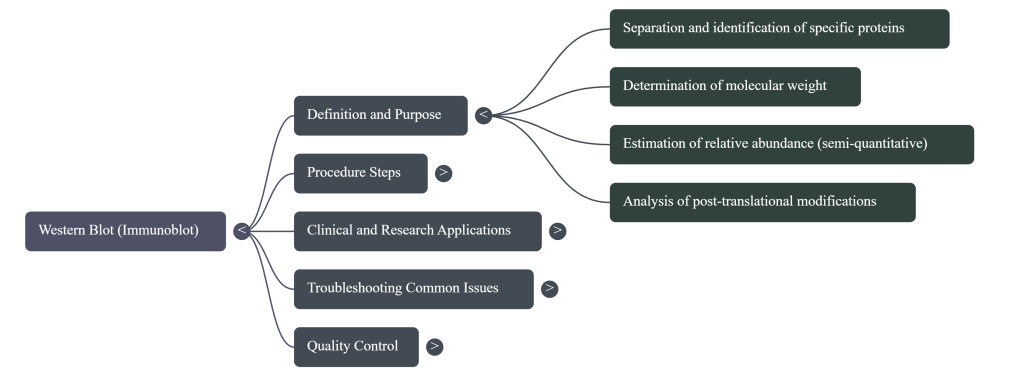
While the name is a play on words, the procedure itself is a rigorous, multi-stage journey of purification and identification that begins with the physical separation of a complex protein mixture. The Western blot (or immunoblot) is the premier analytical search party used to find that needle in the biological haystack.
This technique allows us to separate proteins from a sample, immobilize them on a sturdy support, and use highly specific “homing beacons” called antibodies to identify and quantify our target. The process rests on three indispensable pillars:
• Separation: Sorting the protein mixture by molecular weight using electrophoresis.
• Transfer: Moving the sorted proteins onto a stable, accessible membrane.
• Marking: Using specific antibodies to “label” the target protein for visualization.

The Western blot remains a cornerstone of biomedical research and specialized diagnostics. By visualizing specific proteins, scientists can:
• Understand Protein Expression: Observe whether a protein is produced and how its levels change under experimental conditions.
• Determine Molecular Weight: Use a standard “ruler” to confirm the identity of a protein in kilodaltons (kDa).
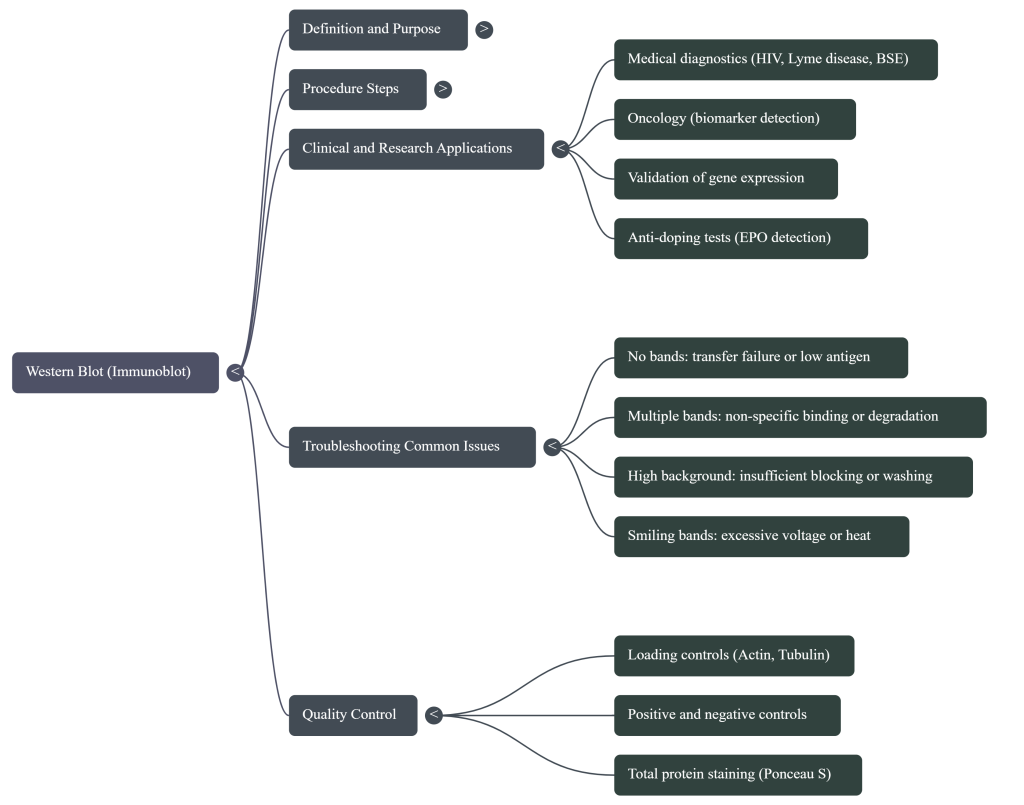
• Clinical Utility: While the CDC now favors other methods for primary HIV screening, the Western blot remains an essential confirmatory tool for infectious diseases like Lyme disease and a definitive test for prion diseases like BSE (“Mad Cow Disease”).
Before we can find our target, we must first “harvest” the proteins from their cellular environment through a controlled extraction.
2. Phase 1: Preparation and the Lysis “Harvest”
To study intracellular proteins, we must release them by bursting the cell membrane, a process called lysis. This requires a “Lysis Buffer” tailored to the sample type (e.g., homogenization for tissues vs. detergent-mediated lysis for cultured cells).
2.1 The Lysis Buffer: Preserving the Proteome
A lysis buffer is a sophisticated chemical cocktail designed to maintain protein integrity once the cell’s internal architecture is disrupted.
| Component | Purpose | The “So What?” |
|---|---|---|
| Detergents (e.g., SDS/Triton X) | Solubilizes lipids and bursts membranes. | Releases the intracellular protein payload into the solution. |
| Protease Inhibitors | Disables protein-cutting enzymes. | Prevents your target from being degraded or “shredded” during extraction. |
| Phosphatase Inhibitors | Preserves phosphorylation status. | Protects the chemical “signaling tags” required for post-translational analysis. |
2.2 Procedural Protocol: Adherent Cell Lysates
1. Initial Wash: Rinse the cell monolayer in the culture dish with ice-cold Phosphate Buffered Saline (PBS). Maintain the samples on ice throughout the procedure.
2. Cell Collection: Add fresh PBS and dislodge cells using a mechanical cell scraper. Transfer the suspension to a microcentrifuge tube.
3. Pellet Formation: Centrifuge the suspension at 1,500 RPM for 5 minutes. Discard the supernatant.
4. Solubilization: Resuspend the pellet in 180 µL of ice-cold lysis buffer supplemented with a 20 µL fresh cocktail of protease and phosphatase inhibitors.
5. Clarification: Incubate on ice for 30 minutes. Centrifuge at 12,000 RPM for 10 minutes at 4°C. Recover the soluble supernatant.

2.3 Quantification and Loading Limits
We must measure the mass of the extracted protein using assays like the Bradford (colorimetric) or BCA (bicinchoninic acid) tests. Polyacrylamide gels have a finite loading capacity; for optimal resolution, we aim for approximately 0.5 μg of protein per well. Exceeding this limit leads to “messy” lanes, protein spillover, and poor band definition.
2.3.1 Protein Quantification and Assay Alignment
The choice of quantification assay must be compatible with the detergents used in the lysis buffer.
| Assay Type | Mechanism | Detergent Tolerance | Analytical Note |
|---|---|---|---|
| BCA | Chelation of Cu2+ with protein backbone | High | Preferred for detergent-heavy RIPA lysates. |
| Bradford | Coomassie Brilliant Blue G-250 binding | Relatively Intolerant | Inaccurate in the presence of high SDS or Triton X-100. |
2.3.2 The Sample Buffer: Preparing for the Race
Once quantified, the sample is mixed with a loading buffer (such as Laemmli or LDS). While SDS is standard, LDS (Lithium Dodecyl Sulfate) is often used in precast systems because it remains more soluble at the cold temperatures often used during electrophoresis. These buffers contain:
• SDS/LDS: Coats proteins in a uniform negative charge.
• Glycerol: Adds density so the sample sinks into the gel wells.
• Bromophenol Blue: A nonreactive dye to track the “front” of the run.
• Reducing Agents (DTT/β-mercaptoethanol): Cleaves disulfide bonds to fully unfold the protein.
The Mechanistic Why of Heating: We heat samples (70–100°C) for 5–10 minutes. This is not just for denaturation; the heat allows the SDS/LDS detergent to access the protein’s internal hydrophobic residues. This ensures a constant charge-to-mass ratio, allowing proteins to migrate solely as a function of their size.
2.4 Principles of Sample Denaturation
To ensure migration is a function of molecular weight alone, the sample must be linearized and uniformly charged:
• SDS (Sodium Dodecyl Sulfate): This anionic detergent coats the polypeptide, imparting a uniform negative charge-to-mass ratio.
• Heat (Linearization): Samples must be heated (70°C–100°C for 5–10 minutes) to unfold secondary and tertiary structures.
• Reducing Agents (DTT or β-mercaptoethanol): Cleavage of intra- and inter-chain disulfide bonds is mandatory to disrupt structural motifs that are insensitive to heat alone.
3. Phase 2: Gel Electrophoresis (The Molecular Sieve)
We use SDS-PAGE (Sodium Dodecyl Sulfate–Polyacrylamide Gel Electrophoresis) to sort the denatured, negatively charged proteins. This process utilizes a “discontinuous buffer system” to ensure all proteins start the race at the same time.
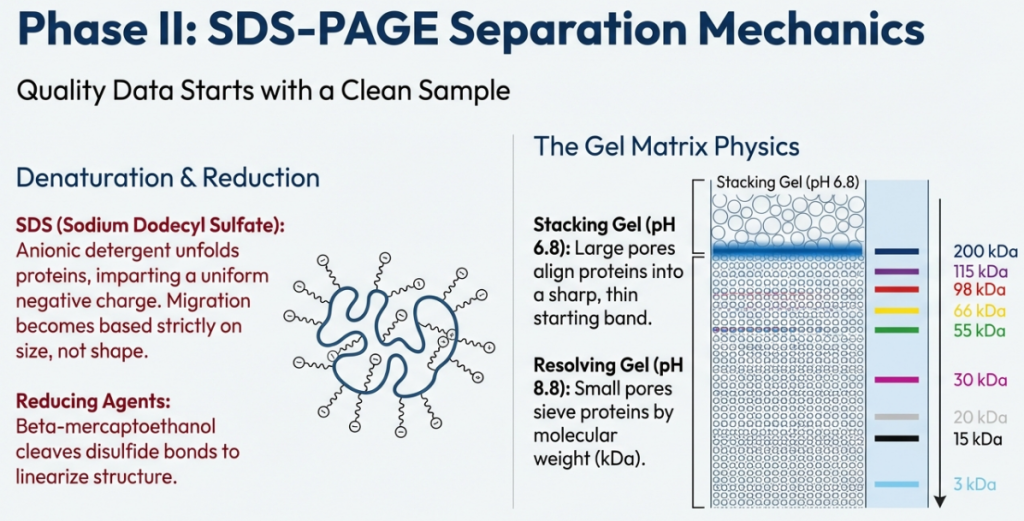
| Feature | Stacking Gel | Resolving (Separating) Gel |
|---|---|---|
| pH Level | Acidic (pH ~6.8) | Basic (pH ~8.8) |
| Pore Size | Large / Highly Porous | Small / Tight Mesh |
| Primary Role | Aligns proteins into thin, sharp bands. | Separates proteins by molecular weight. |
3.1 The Physics of Separation: Electrophoresis and the Power of Charge
The first challenge in identifying a specific protein is the sheer complexity of the cellular environment. Proteins exist in various shapes, sizes, and original charges. To compare them, we use SDS-PAGE (Sodium Dodecyl Sulfate Polyacrylamide Gel Electrophoresis) to create a “level playing field” where molecular weight is the only variable.
The “so what?” of this stage is the total denaturation of the sample. We must transform 3D folded “clumps” into linear chains. While heat and the detergent SDS unfold the protein and impart a uniform negative charge, they cannot break the “staples” of the protein world: disulfide bonds. For this, we require Reducing Agents.
3.2 The Logic of SDS-PAGE
| Component | The “Why” for the Learner |
|---|---|
| SDS (Anionic Detergent) | Unfolds 3D proteins into linear chains and coats them in a uniform negative charge, ensuring migration is toward the positive pole. |
| Reducing Agents (DTT/BME) | Chemically cleaves intra- and inter-chain disulfide bonds. Without these, proteins with complex sulfur bridges will not migrate at their true molecular weight. |
| Heat | Facilitates total denaturation of secondary and tertiary structures, working in tandem with SDS to ensure a fully linear polypeptide chain. |
| Polyacrylamide Mesh | Acts as a molecular sieve. Small proteins navigate the mesh quickly; larger proteins face higher frictional resistance and move slowly. |
3.3 The Mental Model: The Discontinuous Buffer System
To achieve the sharp, crisp “bands” seen in textbooks, we use a Discontinuous Buffer System. Imagine the gel in two parts: a Stacking Gel (pH 6.8) on top and a Resolving Gel (pH 8.8) on the bottom.
In the acidic stacking gel, Glycine (the “trailing ion”) exists as a neutral zwitterion and moves slowly, while Chloride (the “leading ion”) moves fast. The proteins are caught in a “voltage sandwich” between them, forced to compress into a razor-thin line. Once they hit the basic Resolving Gel (pH 8.8), Glycine becomes a fast-moving anion, the “sandwich” dissipates, and the proteins begin their race through the polyacrylamide mesh, separated strictly by size.
Once the proteins are separated within this mesh, they are effectively trapped. To make them accessible for detection, we must move them to a more durable, open surface.
3.4 Buffer Systems and Migration Patterns
The choice of running buffer and gel percentage is dictated by the molecular weight of the target protein.
| Gel Type | % Polyacrylamide | Buffer System | Optimal MW Range |
|---|---|---|---|
| Bis-Tris | 4–12% (Gradient) | MES (Fast run) | 2 – 200 kDa |
| Bis-Tris | 4–12% (Gradient) | MOPS (Slow run) | 14 – 200 kDa |
| Tris-Acetate | 3–8% or 7% | Tris-Acetate | High MW Proteins |
| Tris-Glycine | 12–15% | Tris-Glycine | Low MW Proteins |
During electrophoresis, progress is monitored via the Bromophenol blue dye front and colorimetric protein ladders. A constant voltage of 200V for approximately 50 minutes is standard for many mini-gel systems, provided the buffer is sufficiently cooled to prevent “smiling” bands.
3.4.1 Run Buffer Selection: MES vs. MOPS
The trailing ion in the run buffer dictates the resolution range:
• MES Buffer: Optimized for small proteins (2–200 kDa) and rapid run times.
• MOPS Buffer: Superior for mid-range resolution (14–200 kDa).
3.5 Procedural Precision in Loading
1. Well Preparation: Following comb removal, use a P200 pipette with a gel-loading tip to carefully rinse each well with running buffer to remove storage glycerol and preservatives.
2. Volume Normalization: Adjust all sample volumes to be equal using 1× LDS (Lithium Dodecyl Sulfate) sample buffer. This prevents “lane-leaning” and uneven migration.
3. Loading Limits: For a standard 1.5 mm 10-well mini-gel, the maximum loading volume is 37 µL.
4. Blanking: Any empty wells must be loaded with 1× LDS buffer to ensure a uniform electrical field and prevent band spreading in adjacent lanes.
4. Phase 3: The Transfer (The Leap to Stability)
Transferring (or “blotting”) moves proteins from the gel to a solid membrane. This is essential for three reasons:
1. Accessibility: Membrane pores allow antibodies to reach the immobilized antigens easily.
2. Durability: Membranes are pliable and easier to handle than fragile gels.
3. Versatility: Membranes allow for long-term storage and stripping/re-probing (removing antibodies to test for a different target).
The Layers of the Sandwich (from Negative Cathode to Positive Anode):
1. Sponge/Fiber Pad: Maintains pressure and contact.
2. Filter Paper: Buffer reservoir and gel protector.
3. The Polyacrylamide Gel: The “source” containing the separated proteins.
4. The Membrane (PVDF/Nitrocellulose): The “catcher” located on the Anode (+) side.
5. Filter Paper: Completes the circuit.
6. Sponge/Fiber Pad: Ensures a tight, air-bubble-free assembly.
The membrane now holds a replica of the protein patterns, but they remain invisible to the naked eye until they are “probed” by a molecular search party.
Pro-Tip: The Golden Rule of Orientation Always ensure the membrane is placed between the gel and the Anode (positive/red pole). Because proteins are negatively charged, they will move toward the positive pole. If you reverse this, your proteins will swim out of the gel and into the buffer tank, lost forever.

Moving polypeptides from a 3D gel matrix to a 2D solid support requires the strategic selection of a transfer modality tailored to the target proteome’s characteristics. Choosing the incorrect method is a primary source of analytical failure, particularly in high-stakes clinical environments.
• Electrophoretic Transfer (Wet/Tank vs. Semi-dry):
◦ Wet (Tank) Transfer: Submerging the gel-membrane sandwich in a buffer-filled tank remains the “Gold Standard.” It is explicitly preferred for larger proteins and membrane receptors due to its efficiency and reliability. The use of cooling elements is vital to counteract Joule heating when current exceeds 500 mA.
◦ Semi-dry Transfer: This method utilizes absorbent paper soaked in buffer, placing the sandwich between planar electrodes. While it offers superior speed and reduced buffer consumption, it frequently exhibits poor efficiency for high-molecular-weight species.
• Capillary/Diffusion Transfer: This non-electrophoretic approach relies on buffer movement to drive proteins onto the support. Its strategic value lies in the capacity to produce up to 12 imprints from a single gel, facilitating parallel zymography (activity staining) and subsequent identification via mass spectrometry (MS).
• Vacuum Blotting: Utilizing pump suction to drive polypeptides onto the membrane, this method is effective across a broad size range. However, a consultant must warn that low-concentration polyacrylamide gels have a tendency to stick to the membrane during this process. For low-molecular-weight targets (<14 kDa), 0.2 μm or 0.1 μm pores are mandatory to prevent adsorption failure.
Table 1: Technical Comparison of Transfer Modalities
| Mechanism | Primary Advantage | Speed | Ideal Protein Size Range |
|---|---|---|---|
| Electrophoretic (Wet) | High reliability; flexible | Moderate | Broad (Preferred for Large MW) |
| Electrophoretic (Semi-dry) | Speed; low buffer usage | Fast | Low to Moderate |
| Capillary/Diffusion | Multiple imprints/replicas | Slow | Low to Moderate |
| Vacuum Blotting | Suction-driven efficiency | Moderate | High and Low MW (0.2μm pore) |
While the method of movement is vital, the “landing pad”—the membrane—is equally decisive in determining the downstream viability of the assay.
4.1 Critical Analysis of Membrane Chemistry and Buffer Dynamics
Membrane selection dictates the downstream stability and reprobing potential of the assay. The two primary candidates, Nitrocellulose (NC) and Polyvinylidene Fluoride (PVDF), possess distinct chemical profiles that must be matched to the intended application.
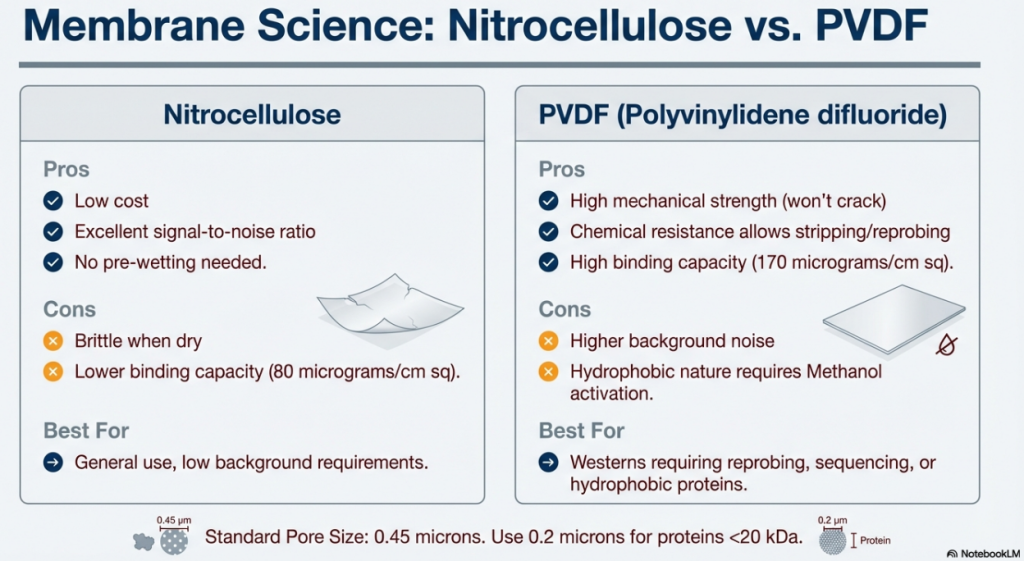
• Nitrocellulose (NC): Historically versatile with a binding capacity of approximately 80 μg/cm², NC is highly compatible with colorimetric detection. However, it is mechanically brittle and cannot withstand the harsh conditions required for multiple stripping and reprobing cycles.
• Polyvinylidene Fluoride (PVDF): PVDF offers superior mechanical strength and chemical resistance. It is the preferred support for MS applications. Being highly hydrophobic, it requires methanol pre-wetting. PVDF typically offers higher protein sensitivity but may result in elevated background noise.
• Nylon Membranes (Zetabind): These offer the highest binding capacity (up to 480 μg/cm²) due to intensive cationization. While they offer superior sensitivity, they are frequently avoided because they bind strongly to anionic dyes like Amido Black and Coomassie Blue, making them nearly impossible to destain without losing the signal.
Buffer Dynamics and pH Resolution: The resolution of the separation is governed by the pH of the gel and running buffers. Bis-Tris-HCl gels maintain a pH of 6.4, utilizing chloride as the leading ion. The choice of trailing ions in the running buffer—MES or MOPS (pH 7.3–7.7)—determines the resolution range: MES is optimized for 2–200 kDa, while MOPS is suited for 14–200 kDa.
Chemical additives further modulate retention. Methanol is traditionally used to increase protein adsorption and stabilize gel geometry; however, a consultant must highlight that for high-molecular-weight proteins (>150 kDa), methanol must be omitted or reduced to prevent protein precipitation and gel pore shrinkage.
4.2 Choosing Your Membrane
| Feature | Nitrocellulose | PVDF (Polyvinylidene Fluoride) |
|---|---|---|
| Binding Capacity | High affinity for protein. | Even higher capacity; more sensitive. |
| Durability | Fragile; brittle when dry. | High mechanical strength; very durable. |
| Preparation | Ready to use. | Must be pre-wetted in methanol. |
| Re-probing | Difficult/Not recommended. | Ideal for stripping and re-probing. |
5. Phase 4: Immunodetection (The Beacon of Specificity)
Once proteins are “stuck” to the membrane, we must find our target without creating “background noise.”
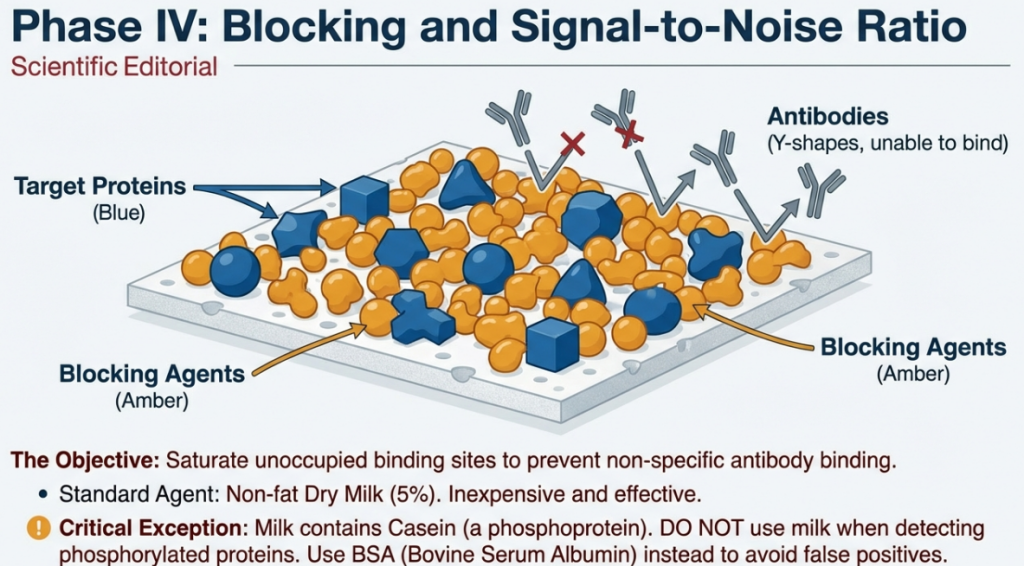
5.1 The Blocking Step
To prevent non-specific binding, the membrane is incubated in a blocking buffer (TBS-T with protein).
• 5% Nonfat Dry Milk: Standard, inexpensive choice.
• BSA (Bovine Serum Albumin): Required for detecting phosphorylated proteins (as milk contains casein, a phosphoprotein) or when using biotin-labeled systems.
• Critical Warning: Never use milk-based blockers when investigating phosphorylated proteins or biotin-labeled systems. Milk contains casein (a phosphoprotein) and biotin, which will cause massive interference and high background noise.
5.2 Incubation and Wash Rigor
• Agitation: All antibody incubations and washes must be performed on a shaker/agitator to ensure even distribution.
• Washing: Use TBST (Tris-Buffered Saline with 0.1% Tween-20). The 0.1% concentration of non-ionic detergent is critical for removing loosely bound antibodies.
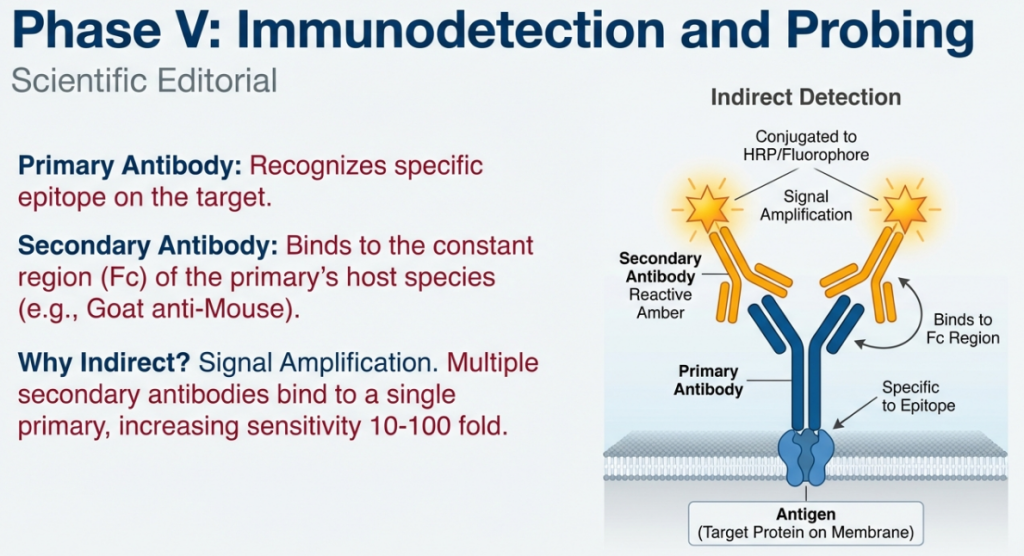
5.3 The Two-Step Antibody Process
| Antibody Type | Role | The “So What?” |
|---|---|---|
| Primary Antibody | Target Specificity | Specifically binds the unique epitope of your target protein. |
| Secondary Antibody | Signal Amplification | Recognizes the primary antibody and carries a “reporter” (tag) for visualization. |
5.4 The Amplification Effect
We use two antibodies instead of one for a vital “so what?”: Signal Amplification.
• Multiple Binding: Because several secondary antibodies can bind to the constant region of a single primary antibody, we “decorate” our target with multiple reporters.
• Visualization of the Scarce: This amplification allows us to see low-abundance proteins that would otherwise be below the limit of detection.
The final stage of the journey is to trigger these “beacons,” so the human eye (or a digital sensor) can record the result.
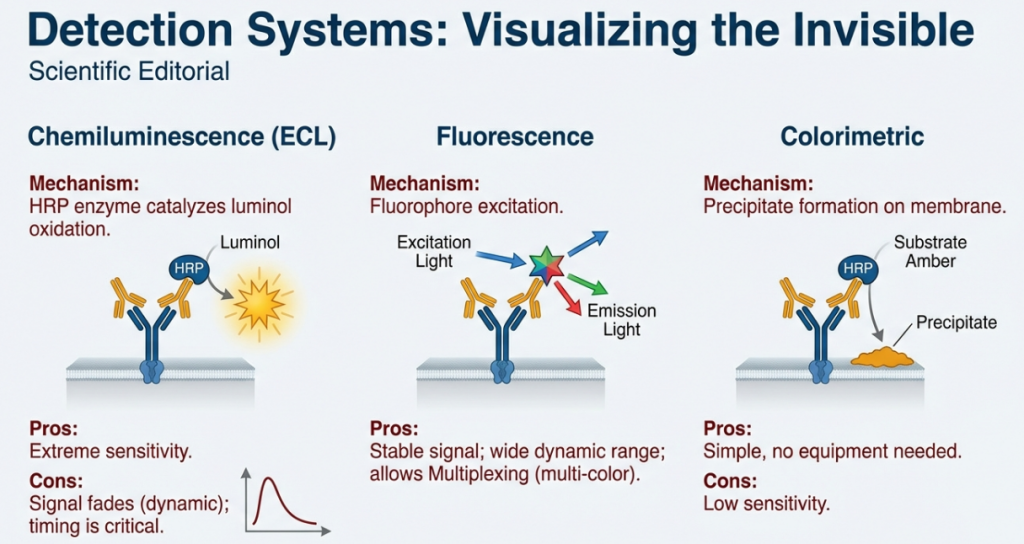
5.5 Detection Systems
• Chemiluminescence: An enzyme (HRP) reacts with a substrate to produce light. This is sensitive but dynamic (non-linear).
• Fluorescence: Fluorophores glow under specific wavelengths. This is the gold standard for quantification because the signal is linear, allowing for a more accurate correlation between brightness and protein mass.
| Detection Method | Mechanism | Best Used For… |
|---|---|---|
| Chemiluminescence | Uses enzymes (HRP/AP) to produce light via a chemical reaction (ECL substrate). | Sensitivity. Best for detecting “needle-in-a-haystack” low-abundance proteins. |
| Fluorescence | Uses antibodies linked to fluorophores that glow under specific wavelengths. | Quantification. The signal is linear, meaning the brightness is directly proportional to the protein amount. |
6. The Final Reveal: Visualization and Quantification
We capture the signal using either darkroom film or digital CCD cameras.
6.1 Quantification, Troubleshooting, and Clinical Utility
Western blots provide semi-quantitative data. The band density is a proxy for protein abundance, not an absolute count. To make valid comparisons between samples, we must use a Loading Control—a “housekeeping” protein like Actin or Tubulin that is expressed at constant levels. By normalizing our target signal to the loading control, we ensure differences are biological rather than due to accidental loading errors.
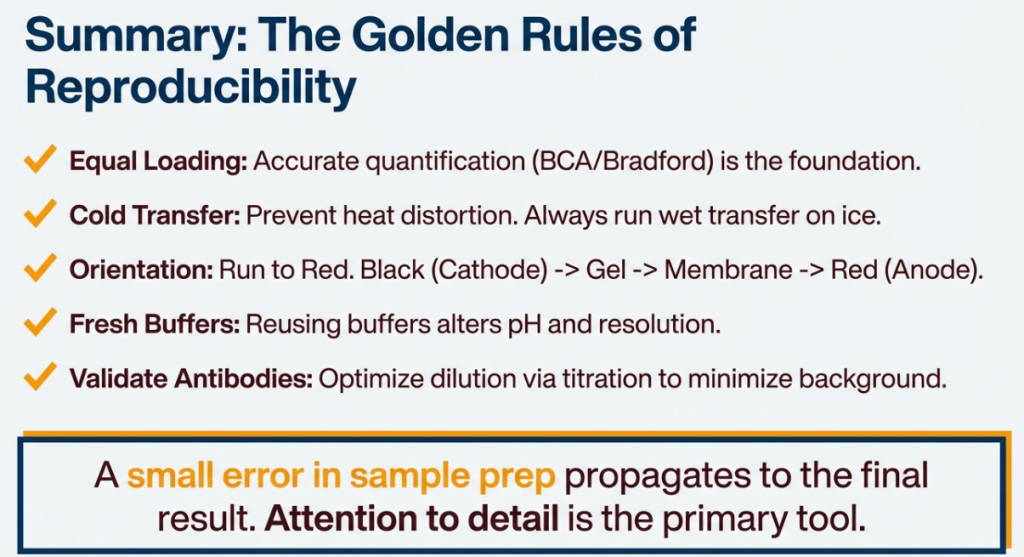
The 3 Golden Rules for Success
1. Equal Loading: Verified by protein assays and loading controls.
2. The Ponceau S Checkpoint: Always use this reversible red dye to verify a complete transfer before starting antibody incubation. It is your most important “fail-safe.”
3. Specific Detection: Optimize antibody concentrations to ensure you are seeing your target, not “ghost” bands.
Densitometry evaluates band intensity to provide relative comparisons between experimental conditions.
6.1.1 Normalization and Housekeeping Proteins
To correct for variations in loading or transfer, signals must be normalized against ubiquitously expressed housekeeping proteins. Flotillin-1 is a particularly effective control for analyzing specific protein amounts across gradients (1–7 μg/well). Other common controls include β-actin and α-tubulin.
6.1.2 Clinical and Diagnostic Significance
While the CDC no longer supports Western blotting as a primary diagnostic tool for HIV (favoring faster assays), it remains an essential confirmatory tool in research and specific diagnostic pipelines:
• HIV and Prion Diagnostics: The technique remains a confirmatory pillar for HIV-1/2, identifying specific anti-viral antibodies in patient serum. Similarly, it is the definitive test for Bovine Spongiform Encephalopathy (BSE) and variant Creutzfeldt–Jakob disease, distinguishing disease-specific prion isoforms.

• World Anti-Doping Agency (WADA): In high-stakes clinical pathology, the technique is used to detect blood doping. For the 2014 FIFA World Cup, Reichel et al. utilized horizontal SAR-PAGE with Velum SAR precast gels to enhance the discriminatory capacity of the assay, detecting micro-doses of recombinant erythropoietin (rEPO) in urine and blood with unprecedented precision.
• Target Identification: The technique is essential for epitope mapping and validating antibody specificity against engineered tags (e.g., HA-tag, Myc-tag), facilitating the identification of therapeutic targets in oncology.
In summary, Western blotting is a multi-step analytical powerhouse. Success depends on the synthesis of biochemical “whys”—from the ion hierarchy in the gel to the hydrophobicity of the membrane—to transform a complex lysate into actionable molecular data.
6.2 The Troubleshooting Guide
| Observation | Probable Cause | The Fix |
|---|---|---|
| No bands visible | Transfer failure or low antibody concentration. | Perform Ponceau S stain to verify transfer; increase antibody concentration. |
| High Background | Inadequate blocking or insufficient washing. | Increase blocking time; use more TBST wash cycles; ensure the membrane stays hydrated. |
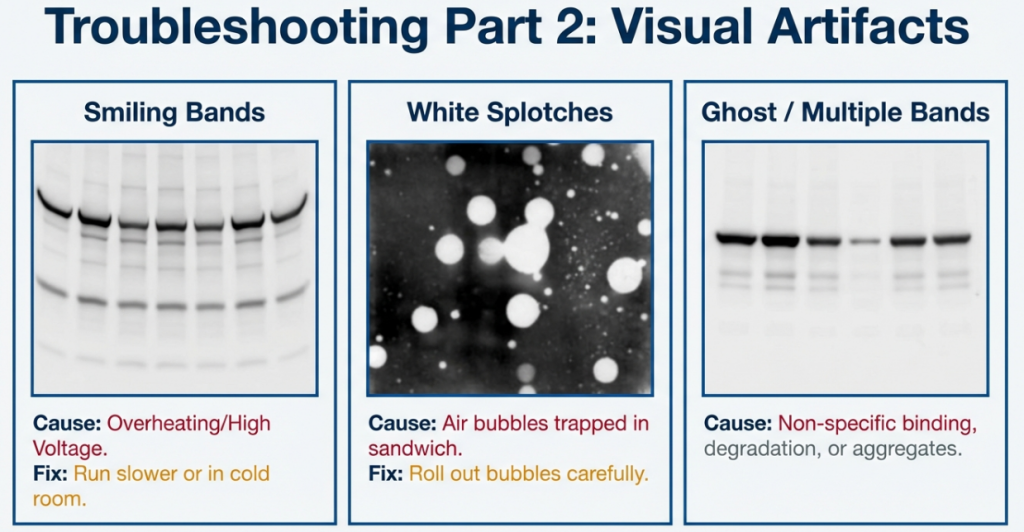
| “Smiling” Bands | Overheating due to high voltage. | Reduce the voltage to minimize heat generation and gel expansion. |
| White “Ghost” Bands | Signal burnout (too much HRP/substrate). | Dilute your primary antibody or load less protein in the well. |
| Splotchy/Patchy Blot | Air bubbles in the transfer sandwich. | Use a roller to meticulously remove all bubbles between the gel and membrane. |

Remember, Western blotting is a sophisticated craft. Success requires more than just following a protocol—it requires an understanding of the chemical forces at play in every step. With patience and attention to these mechanics, clarity is inevitable.
6.3 Optimization Strategies for Molecular Weight-Dependent Retention
A “one-size-fits-all” protocol is the primary cause of the “retention gap” or the “blow-through” phenomenon. Strategic intervention at the lysis and loading stages is required to maximize analytical precision.
• Strategic Sample Lysis: The choice of lysis buffer must correspond to the target’s subcellular localization. Radioimmunoprecipitation assay (RIPA) buffer is specifically recommended for extracting nuclear and mitochondrial proteins.
• Loading Normalization: To avoid band spreading and irregular migration, an “equal volume load” is as technically critical as an “equal protein load.” Empty wells should be filled with 1× LDS buffer blanks to maintain uniform resistance.
• High MW Optimization (>150 kDa): Use wet transfer systems with extended durations. Omit methanol to prevent precipitation and promote the elution of these larger species.
• Low MW Optimization (<20 kDa): Utilize 0.2 μm pore size membranes and implement glutaraldehyde fixation to increase retention. SDS-free transfer buffers may also be employed to minimize “blow-through.”
6.3.1 Modern Normalization Standards:
1. Total Protein Staining (TPS): This is the modern “best practice.” Utilizing reversible stains like Ponceau S or Sypro Ruby allows for normalization based on the actual protein amount per lane. This is superior to traditional housekeeping proteins (e.g., β-actin, α-tubulin), which may be affected by experimental conditions or exhibit non-linear signals.
2. Loading Controls: If housekeeping proteins are used, their signal must be validated as stable across all experimental groups.
7. Glossary of Core Principles
• Blocking: Coating the membrane with a generic protein solution (like BSA or non-fat milk) to prevent antibodies from sticking to the empty membrane. Caution: Milk contains Casein, a phosphoprotein that can interfere with the detection of phosphorylated targets.
• Epitope: The specific structural region of a protein that is recognized and bound by a primary antibody.
• Molecular Weight Marker (Ladder): A mixture of pre-stained proteins of known sizes, used as a “ruler” to estimate the mass of the target protein.
• Normalization (Loading Control): Probing for a “housekeeping protein” (e.g., Actin, Tubulin, or GAPDH) that remains constant across samples. This ensures that a change in signal is due to the experiment, not because more total protein was loaded into one well.
Image Summary

Questions/Answers
1. How do the fundamental stages of western blotting enable protein detection and quantification?
Western blotting enables protein detection and quantification through a multi-step process that separates proteins by size, immobilizes them on a solid support, and uses labeled antibodies to visualize specific targets. The fundamental stages—sample preparation, gel electrophoresis, transfer, blocking, and immunodetection—work sequentially to ensure that proteins are accessible and identifiable within a complex mixture.
1. Sample Preparation and Separation
To enable detection, proteins must first be extracted from cells or tissues using a lysis buffer, which often contains protease inhibitors to prevent degradation. The samples are then treated with a detergent, typically sodium dodecyl sulfate (SDS), and heated to denature the proteins, unfolding them into linear chains. SDS also imparts a uniform negative charge to all proteins, ensuring they migrate through an electric field solely based on their molecular weight rather than their native shape or charge.
Gel electrophoresis (specifically SDS-PAGE) then separates these proteins as they move through a polyacrylamide mesh. Smaller proteins travel more rapidly through the gel’s pores than larger ones, creating a series of “bands” representing different molecular weights. A protein ladder or standard of known weights is run alongside the samples to provide a reference for identifying the size of the target protein.
2. Blotting (Transfer) and Immobilization
Once separated, proteins are trapped inside the gel and are not easily accessible to large antibody molecules. Blotting refers to the electrophoretic transfer of these proteins from the gel onto a thin, sturdy membrane (typically nitrocellulose or PVDF). An electric current pulls the negatively charged proteins out of the gel and onto the membrane, where they are immobilized in a pattern that is an exact replica of the gel. This stage makes the proteins accessible on a surface for subsequent probing.
3. Blocking and Immunodetection
To ensure the specificity of detection, the membrane undergoes blocking, where it is incubated in a dilute protein solution (such as non-fat dry milk or BSA). This step coats the unoccupied areas of the membrane to prevent antibodies from binding non-specifically to the support itself, which would otherwise cause high “background noise”.
The detection of the specific protein is achieved through a two-step antibody process:
• Primary Antibody: A specific antibody is added that recognizes and binds only to the target protein’s epitope.
• Secondary Antibody: This antibody recognizes the host species of the primary antibody and is conjugated to a reporter molecule (such as an enzyme like HRP, a fluorophore, or a radioactive tag).
4. Visualization and Quantification
The reporter on the secondary antibody generates a signal—such as light (chemiluminescence), color (colorimetric), or fluorescence—at the exact location of the target protein. This signal is captured using imaging systems or film.
Quantification in western blotting is generally considered semi-quantitative because it provides a relative comparison of protein levels rather than an absolute mass. This is enabled by two primary methods:
• Densitometry: Analyzing the thickness and intensity of the protein bands; a denser, darker band indicates a higher abundance of the protein in that sample.
• Normalization: To ensure analytical validity, researchers use loading controls (typically housekeeping proteins like β-actin or α-tubulin) to confirm that equal amounts of total protein were loaded into each lane. Normalizing the target protein’s signal to the loading control’s signal allows for a statistical assessment of expression differences across different experimental conditions.
While chemiluminescence is highly sensitive, fluorescent detection is often preferred for more precise quantification because the signal generated is linear across a wider range of protein concentrations.
2. What experimental variables and troubleshooting strategies ensure the accuracy of protein analysis results?
Ensuring the accuracy of protein analysis, particularly in Western blotting, requires meticulous control of experimental variables throughout a multistep process involving sample preparation, electrophoresis, transfer, and detection.
Critical Experimental Variables
• Sample Preparation and Protein Normalization: Accurate results depend on the effective solubilization of proteins using lysis buffers tailored to the sample type and target protein’s subcellular location. It is essential to include protease and phosphatase inhibitors to prevent degradation and preserve post-translational modifications. Accuracy is further ensured by quantifying protein concentration (e.g., using BCA or Bradford assays) to guarantee equal loading across all lanes, which is a prerequisite for reliable quantitative interpretation.
• Protein Denaturation and Reduction: To ensure proteins separate solely by molecular weight, samples are typically heated with SDS to impart a uniform negative charge and treated with reducing agents like DTT or β-mercaptoethanol to disrupt disulfide bonds. However, some antibodies only recognize 3D conformational epitopes, requiring non-denaturing conditions for accurate detection.
• Gel and Buffer Systems: The percentage of polyacrylamide in the gel must be optimized for the target protein’s size; higher concentrations resolve smaller proteins better, while lower concentrations are suited for larger proteins. The choice of running buffer (e.g., MES vs. MOPS) also influences separation speed and resolution.
• Transfer Efficiency: Proteins must be effectively moved from the gel to a solid support, such as nitrocellulose or PVDF. PVDF is often preferred for its higher binding capacity and durability, though it may produce higher background signals. Methanol in the transfer buffer aids in stripping SDS and enhancing protein adsorption.
• Detection Parameters: Blocking (using nonfat milk or BSA) is vital to prevent nonspecific antibody binding to the membrane. Antibody concentrations should be determined through titration series to find the optimal signal-to-noise ratio. For quantification, fluorescent-labeled antibodies are often superior to enzyme-linked reporters because they offer a linear signal response.
Troubleshooting Strategies
Common issues in Western blotting can be addressed through targeted adjustments to the experimental protocol:
| Problem | Potential Causes | Troubleshooting Strategy |
|---|---|---|
| No or Weak Signal | Low antigen concentration, inactive antibodies, or improper transfer. | Use a positive control to verify the system; increase antibody concentration or exposure time; check transfer efficiency with Ponceau S staining. |
| High Background | Excessive antibody concentration, insufficient blocking, or inadequate washing. | Decrease antibody concentration; extend blocking time; or increase the frequency and duration of washing steps. |
| Unexpected Multiple Bands | Protein degradation, multimer formation, or nonspecific antibody binding. | Add fresh protease inhibitors; increase sample heating time to break quaternary structures; or further dilute the primary antibody. |
| “Smiling” or Irregular Bands | High voltage leading to overheating, air bubbles, or uneven gel polymerization. | Run the gel at a lower voltage; ensure the transfer “sandwich” is free of air bubbles; and optimize buffer resistance. |
| White (Negative) Bands | Too much protein or antibody, depleting the detection substrate. | Reduce the amount of protein loaded or lower the antibody concentration. |
Ensuring Analytical Validity
To validate findings, experiments must include positive controls (known antigen) and negative controls (null cell lines). Loading controls, such as housekeeping proteins like β-actin or α-tubulin, are necessary to normalize data and correct for variations in loading or transfer efficiency. Modern analysis is increasingly moving toward total protein staining for normalization, as it is often more reliable than single housekeeping proteins. Additionally, researchers should adhere to a minimum reporting standard (detailing gel percentage, antibody concentrations, and transfer methods) to ensure reproducibility.
3. How do nitrocellulose and PVDF membranes compare in protein binding?
Based on the sources, nitrocellulose (NC) and polyvinylidene fluoride (PVDF) are the two primary membrane types used for protein immobilization in western blotting. While both utilize hydrophobic and non-covalent interactions to bind proteins, they differ significantly in their binding capacity, durability, and suitability for specific downstream applications.
Binding Capacity and Mechanism
• Capacity: PVDF generally surpasses nitrocellulose in protein-binding capacity. For example, the protein-binding capacity of PVDF is approximately 170 μg/cm2, whereas some sources indicate NC is significantly lower, around 80 μg/cm2.
• Mechanism: Nitrocellulose interacts with biomolecules through non-covalent, hydrophobic mechanisms. PVDF binding is achieved through a combination of dipole and hydrophobic interactions.
• SDS Influence: PVDF is noted for its superior transfer efficiency and protein retention even in the presence of sodium dodecyl sulfate (SDS).
Physical Properties and Handling
• Durability: Nitrocellulose is notably fragile and brittle, particularly when dry, and must be handled with care to avoid damage. In contrast, PVDF membranes are sturdier, thicker, and provide better mechanical support.
• Pre-wetting: Because PVDF is highly hydrophobic and contains no added surfactants, it requires pre-wetting in methanol or ethanol before it can be used with aqueous buffers. Nitrocellulose does not require this step but must be thoroughly saturated with buffer.
• Cost: Nitrocellulose is generally less expensive than PVDF.
Signal-to-Noise Ratio and Background
• Background Noise: PVDF’s higher protein sensitivity and binding capacity often lead to higher non-specific protein binding and increased background signal compared to nitrocellulose.
• Mitigation: To counteract higher background on PVDF, careful and thorough washing steps are essential.
Downstream Applications and Reusability
• Stripping and Reprobing: A major advantage of PVDF is its ability to withstand stripping and reprobing. While protocols exist to strip antibodies from nitrocellulose, its fragile nature often prevents it from being reused multiple times.
• Specialized Analysis: PVDF is the preferred choice for downstream applications such as N-terminal protein sequencing and mass spectrometry.
Pore Size Considerations
Both membrane types are available in various pore sizes, typically ranging from 0.1 to 0.45 μm. A pore size of 0.45 μm is standard for most proteins, but smaller pores (e.g., 0.2 μm) are recommended for proteins with low molecular weights (less than 20 kDa) to prevent them from passing through the membrane, a phenomenon known as “blow through”.
4. What causes ‘smiling’ bands and other common electrophoresis errors?
In western blotting, errors during the gel electrophoresis stage can significantly compromise the clarity and accuracy of protein separation. According to the sources, several factors contribute to “smiling” bands and other common procedural mistakes.
The Causes of “Smiling” Bands
A “smiling” or “smiley” pattern refers to the uneven migration of protein bands across the gel, typically where the bands at the edges of the gel move slower than those in the center,. This distortion is primarily caused by:
• Excessive Voltage: High voltage increases electrical resistance, which in turn elevates the temperature within the electrophoresis tank. This creates “heat pockets” that alter protein mobility and cause rapid, nonlinear migration,. High voltage can also generally overheat the system and distort the bands.
• Air Bubbles: Bubbles trapped within the gel or the transfer sandwich disrupt uniform electrical conductivity, leading to localized irregularities in how the proteins move.
• Sample Overloading: If the volume or mass of the protein loaded into a well is excessive, it can cause spillover between lanes, leading to skewed or distorted bands.
Other Common Electrophoresis Errors
The sources identify several other issues that occur during the separation phase:
• Unexpected or Multiple Bands:
◦ Protease Degradation: If proteins are broken down by enzymes during preparation, bands may appear at unexpected, lower molecular weight positions,. This is mitigated by using protease inhibitors and keeping samples on ice.
◦ Multimer Formation: Some proteins form dimers, trimers, or larger multimers, causing bands to appear higher than expected,. Reheating the sample for longer periods can help break these quaternary structures.
◦ Post-Translational Modifications (PTMs): PTMs or various isoforms can cause multiple bands to appear in different molecular weight areas.
• Blurry or Non-flat Bands:
◦ Low Resistance: If proteins travel too fast through the gel due to low resistance, the bands may not be flat.
◦ Empty Wells: Leaving wells empty can cause band spreading; it is recommended to load unused wells with a “blank” sample buffer (such as 1x LDS) to ensure an even run.
◦ Buffer Quality: Using old or contaminated running buffers can cause blurry results; changing to a fresh buffer often resolves the issue.
• Complete Loss of Sample (No Bands):
◦ Overrunning the Gel: If the electrophoresis process is allowed to run for too long, the proteins may travel entirely off the bottom of the gel and into the buffer tank. Monitoring the bromophenol blue dye front is essential to prevent this,.
◦ Insufficient Stacking: The stacking gel is designed to align proteins into a thin, defined band before they enter the resolving gel; if the pH or acrylamide concentration is incorrect, the bands will not be sharply defined.
5. How do MES and MOPS buffers change protein separation results?
The choice between MES (2-(N-morpholino)ethanesulfonic acid) and MOPS (3-(N-morpholino)propanesulfonic acid) running buffers significantly alters the separation range and migration speed of proteins during gel electrophoresis, particularly when using Bis-Tris gel systems.
According to the sources, these buffers influence protein separation in the following ways:
1. Targeted Molecular Weight Ranges
The primary difference between the two buffers is the range of protein sizes they are optimized to resolve.
• MES Buffer: This buffer is better suited for separating smaller proteins. It provides a separation range of 2–200 kDa.
• MOPS Buffer: This buffer is preferred for mid-to-large-sized proteins. It provides a separation range of 14–200 kDa.
Researchers select the specific gel and buffer combination based on the predicted molecular weight of their target protein to achieve optimal resolution.
2. Migration Speed
The buffers also affect the total duration of the electrophoresis run. The sources explicitly state that MES buffer runs faster than MOPS. Consequently, using MES can reduce the overall time required for the electrophoresis stage of the western blot protocol.
3. Ion Dynamics and Mechanism
Both MES and MOPS function within a discontinuous buffer system, specifically with neutral-pH Bis-Tris gradient gels.
• Trailing Ions: In this system, either MES or MOPS serves as the trailing ion (−) in the running buffer.
• Lead Ions: They interact with chloride (Cl−), which acts as the lead ion originating from the gel buffer (Bis-Tris–HCl).
• Common Ion: Bis-Tris (+) serves as the common ion present in both the gel and the running buffer.
The physical properties of these trailing ions dictate how effectively proteins of different sizes are “pushed” through the polyacrylamide mesh, thereby shifting the resolution power of the gel to different molecular weight areas.
6. How do air bubbles affect protein transfer to the membrane?
Air bubbles are a significant technical obstacle in western blotting because they disrupt the uniform electrical conductivity required for a successful electrophoretic transfer. Because electricity cannot flow through air as it does through the transfer buffer, bubbles act as insulators that block the movement of proteins in specific areas.
According to the sources, air bubbles affect protein transfer and results in the following ways:
• Creation of “White Spots” or Patches: The most common visual evidence of an air bubble is the appearance of white patches or spots on the final film or image. These occur because the proteins were physically blocked from moving out of the gel and onto the membrane at the location of the bubble.
• Irregular or Patchy Signal: Bubbles lead to patchy and uneven spots on the blot, which can interfere with the ability to accurately quantify or even detect the target protein.
• Band Distortion: Air bubbles present during the transfer process can contribute to the formation of blurry bands, compromising the resolution of the protein analysis.
• Localized Migration Irregularities: By disrupting the electrical field, bubbles cause localized migration irregularities, meaning the proteins may not move in the straight, perpendicular path required to create an exact replica of the gel on the membrane.
Prevention Strategies
To ensure the accuracy of the transfer, the sources emphasize several procedural steps to eliminate bubbles:
• Submerged Assembly: The transfer “sandwich”—consisting of the gel, membrane, filter papers, and pads—should be assembled while submerged in transfer buffer to prevent air from being trapped between the layers.
• Squeezing and Rolling: Researchers are advised to squeeze out extra liquid and ensure there are no bubbles specifically between the gel and the membrane, as this interface is the most critical for successful immobilization.
• Careful Gel Preparation: While transfer bubbles are the most common issue, air bubbles must also be avoided during gel polymerization when inserting the comb to ensure the wells are formed correctly for the initial electrophoresis.
7. What are the benefits of using precast horizontal gels?
According to the sources, the use of precast horizontal gels and related horizontal systems offers several advantages regarding convenience, efficiency, and analytical sensitivity.
Convenience and Consistency
• Ease of Use: Precast gels are described as a convenient and cost-effective alternative to hand-casting gels within the laboratory.
• Extended Shelf Life: These gels are manufactured with a long shelf life, typically lasting up to 16 months when stored at 4°C.
• Optimization: Certain precast horizontal gels, such as film-supported Velum SAR gels, are specifically optimized for routine analysis.
Enhanced Analytical Performance
• Improved Sensitivity: The adoption of horizontal SAR-PAGE combined with specialized precast gels has been shown to significantly enhance the discriminatory capacity for detecting low-level substances, such as micro-dose applications of recombinant erythropoietin (rEPO) in anti-doping campaigns.
• Resolution: Precast gels come in various formats, including gradient gels (e.g., 4–12% Bis-Tris), which allow for the separation of a wide range of protein molecular weights on a single gel.
Operational Efficiency in Horizontal Systems
The sources also highlight benefits associated with the “horizontal” or “semi-dry” configuration often used with these gels:
• Simultaneous Processing: Horizontal blotting allows for multiple gels to be blotted simultaneously, which can streamline the workflow.
• Lower Power and Resource Requirements: These systems typically require less power for the transfer process than vertical tank systems.
• Cost-Effective Components: Horizontal setups can utilize inexpensive electrodes, such as graphite or carbon blocks, rather than more costly platinum wires.
• Reduced Buffer Consumption: Horizontal “semi-dry” blotting requires only a minimal volume of buffer to moisten the transfer sandwich, whereas vertical wet transfers require large buffer volumes to fill a tank.
8. What are the pros and cons of using gradient gels?
Based on the sources, gradient gels—specifically polyacrylamide gradient gels—are designed with a varying concentration of acrylamide throughout the gel matrix, which offers distinct advantages and some practical considerations for protein separation.
Pros of Using Gradient Gels
• Broad Separation Range: The most significant advantage of gradient gels is their ability to separate a wide range of molecular weight proteins on a single gel. For example, a 4–12% Bis-Tris gradient gel is commonly used to resolve proteins ranging from 2 kDa to 200 kDa.
• Optimal Resolution for Complex Mixtures: Because the pore size decreases as proteins migrate further down the gel (moving from a lower percentage of acrylamide at the top to a higher percentage at the bottom), gradient gels provide better resolution for both large and small proteins simultaneously. Smaller proteins are resolved by the higher acrylamide concentration at the bottom, while larger proteins can enter and migrate through the larger pores at the top.
• Convenience and Stability: Precast gradient gels are often preferred because they are a convenient and cost-effective option compared to hand-casting gels. They also typically offer a long shelf life, such as the 16-month shelf life noted for certain precast gradient formats.
• Enhanced Quantification: By providing clearer separation across a broad spectrum, gradient gels can assist in a more accurate semi-quantitative estimation of proteins within a complex mixture.
Cons and Limitations
• Potential Loss of Specificity: While gradient gels are excellent for broad ranges, a single-percentage gel may be superior for resolving proteins within a very narrow molecular weight range. For instance, if a researcher only needs to resolve very small proteins, a fixed 15% acrylamide gel might provide higher resolution for those specific low-molecular-weight targets than a gradient gel that allocates only a portion of its length to that concentration.
• Complexity in Hand-Casting: Although precast versions are convenient, the sources imply that casting gradient gels in the laboratory is a more complex process than casting a standard “stacking and resolving” single-percentage gel, which requires only two distinct layers of polyacrylamide.
• Transfer Efficiency Concerns: While not a “con” of the gel itself, resolving a very wide range of proteins on one gradient gel can create challenges during the blotting (transfer) stage. Conditions optimized for the transfer of small proteins resolved at the bottom of a gradient gel may result in the under-transfer of larger proteins at the top, or vice versa. Researchers may need to use a two-step electrotransfer or gradient electric fields to ensure quantitative transfer for the entire range resolved by the gel.
9. Why must PVDF membranes be pre-wet with methanol before use?
Polyvinylidene fluoride (PVDF) membranes must be pre-wet with methanol because the material is highly hydrophobic, meaning it naturally repels water. Unlike some other membrane types, PVDF contains no added surfactants to facilitate its interaction with aqueous solutions.
Because of this water-repellent nature, the membrane cannot be properly saturated by aqueous transfer buffers alone. Wetting the membrane with an organic solvent—typically methanol, but sometimes ethanol or isopropanol—is a prerequisite before it can be used with these buffers. This preparation step is essential to ensure that the buffer can penetrate the membrane’s pores, which in turn allows for the necessary flow of current during the electrophoretic transfer of proteins from the gel to the solid support.
10. Can antibodies recognize proteins without heat-mediated denaturation?
Yes, antibodies can recognize proteins without heat-mediated denaturation. While standard western blotting protocols involve heating samples to unfold proteins, some antibodies are specifically designed to recognize conformational epitopes, which are dependent on the protein’s native 3D shape.
Antibody Recognition and Epitope Types
The effectiveness of an antibody depends on whether the target epitope is linear or conformational:
• Conformational Epitopes: Some antibodies only recognize the 3D structure of a protein. If these proteins are denatured through heat or detergents like SDS, the antibody will become ineffective because the specific shape it recognizes no longer exists.
• Linear (Continuous) Epitopes: These antibodies recognize a specific sequence of amino acids in a row. They generally perform better in standard western blots because the process of unfolding the protein through denaturation can actually expose these epitopes, making them more accessible to the antibody.
Experimental Adjustments for Native Proteins
If a target protein must be analyzed in its native state to ensure antibody recognition, researchers adjust several fundamental stages of the protocol:
• Mild Lysis Buffers: Instead of using harsh detergents that unfold proteins, researchers use mild lysis buffers that exclude detergents to preserve the protein’s native conformation.
• Cold Extraction: Protein extraction is performed at cold temperatures with protease inhibitors to prevent both enzymatic degradation and unintended denaturation.
• Native Gel Electrophoresis: Rather than using SDS-PAGE (which denatures proteins and separates them by size), proteins can be separated using native PAGE. This method separates proteins based on their 3-D structure, electric charge, or isoelectric point while keeping them in their native, folded state.
• Skipping the Heat Step: In these specialized cases, the standard step of heating samples for 5–10 minutes at 70–100°C is omitted to ensure the 3D structural motifs remain intact.
Preservation of Specific Structures
In some instances, researchers may wish to denature the overall protein structure while retaining specific features like disulfide bridges. In these protocols, samples are heated to denature higher-order structures but are not treated with reducing agents (like β-mercaptoethanol), allowing certain chemical bonds to remain and potentially preserve the antibody’s target epitope.
11. Why is methanol critical for protein adsorption during transfer?
In western blotting, methanol is a critical component of the transfer (Towbin) buffer because it facilitates the immobilization of proteins as they move from the gel to the membrane. According to the sources, methanol serves several mechanical and chemical functions that ensure proteins adhere correctly to the solid support.
Enhancing Adsorption through SDS Removal
The most significant role of methanol in protein adsorption is its ability to strip sodium dodecyl sulfate (SDS) from the proteins. During electrophoresis, SDS coats proteins to give them a uniform negative charge, but this coating can interfere with the protein’s ability to bind to the membrane. Methanol promotes the removal of these SDS molecules, which increases the hydrophobicity of the proteins and allows them to bind more effectively to the membrane via non-covalent and hydrophobic interactions. This is particularly important for nitrocellulose membranes, where methanol is known to increase the binding capacity and help proteins stay attached during subsequent washing steps.
Gel and Membrane Stabilization
Methanol also acts as a structural stabilizer during the transfer process:
• Gel Geometry: It stabilizes the geometry of the gel, preventing it from swelling in the low-ionic strength transfer buffer. If the gel were allowed to swell during transfer, the resulting protein bands would appear distorted or “blurry” on the membrane.
• Temperature Control: The electrical resistance during transfer generates heat; methanol helps by cooling the gel and counteracting thermal expansion during the equilibration phase.
• Membrane Pre-wetting: For PVDF membranes, methanol is essential for the initial “pre-wetting” step. Because PVDF is highly hydrophobic and contains no surfactants, it repels aqueous buffers unless it is first saturated with an organic solvent like methanol to allow buffer penetration into the pores.
Considerations for Large Proteins
While critical for many applications, the sources note that methanol can be a “double-edged sword” depending on the target protein’s size. Methanol can shrink the pores of the gel and precipitate large proteins (typically those greater than 150 kDa). If large proteins precipitate before they can exit the gel, the transfer efficiency drops significantly. Consequently, for high-molecular-weight targets, researchers often reduce or eliminate methanol from the transfer buffer to ensure the proteins can successfully migrate out of the gel matrix.
12. Can you explain how stripping and reprobing works on PVDF?
Stripping and reprobing is a process used in western blotting to remove the antibodies from a previously analyzed membrane so that it can be reused to detect a different target protein. This technique is highly effective on PVDF (polyvinylidene fluoride) membranes due to their unique physical and chemical properties.
The Role of PVDF in Reprobing
PVDF is the preferred support for this process because it provides better mechanical support and chemical resistance compared to nitrocellulose.
• Durability: Nitrocellulose is brittle and fragile, often making it unable to withstand the harsh conditions required to strip antibodies. In contrast, PVDF is sturdier, thicker, and more resistant to damage during repeated use.
• Protein Retention: PVDF has a high protein-binding capacity (170 μg/cm2), ensuring that the target proteins remain immobilized on the membrane even while the antibodies are being chemically removed.
How the Process Works
According to the sources, the procedure involves two main phases:
1. Stripping: Researchers use well-established protocols to “strip” the primary and secondary antibodies off the membrane. While the sources do not provide specific chemical recipes, they note that the process relies on the membrane’s chemical stability to handle the stripping reagents without losing the bound proteins.
2. Reprobing: Once the initial antibodies are removed, the membrane can be re-blocked and incubated with a new set of primary and secondary antibodies to detect a different antigen.
Benefits and Limitations
• Multiple Analyses: A single protein transfer on PVDF can be used for multiple successive analyses, allowing researchers to conserve limited samples or compare different proteins on the exact same blot.
• Storage: PVDF blots can be stored and reprobed later, providing flexibility in experimental timelines.
• Background Noise: A primary limitation of this technique is that background noise eventually increases with repeated stripping, which may eventually limit the clarity of subsequent experiments.
• Sensitivity: PVDF generally has a higher background than nitrocellulose, so careful washing is essential throughout the reprobing process to ensure a clear signal.
13. How do you choose between methanol or ethanol for wetting?
The choice between methanol or ethanol for wetting is specific to polyvinylidene fluoride (PVDF) membranes, as nitrocellulose membranes do not require an alcohol pre-wetting step. Because PVDF is highly hydrophobic and contains no added surfactants, it naturally repels the aqueous buffers required for protein transfer.
According to the sources, you may choose between these solvents based on the following considerations:
1. Universal Capability for Wetting
Both methanol and ethanol (as well as isopropanol) are effective at saturating the PVDF membrane’s microporous structure. This wetting is a prerequisite to allow aqueous transfer buffers to penetrate the pores, which enables the flow of electric current and subsequent protein immobilization.
2. Advantages of Methanol
Methanol is the most commonly cited solvent in standard western blotting protocols for several reasons:
• SDS Removal: Methanol is critical in the transfer buffer because it strips SDS (sodium dodecyl sulfate) from proteins, increasing their hydrophobicity and improving their ability to adsorb to the membrane.
• Gel Stabilization: It stabilizes the geometry of the gel, preventing it from swelling in low-ionic strength buffers, which helps maintain sharp protein bands.
• Temperature Control: Methanol helps cool the gel during the transfer process, counteracting the heat generated by electrical resistance.
• Standard Recipes: Most traditional Towbin transfer buffers specifically call for 10–20% methanol.
3. Choosing Ethanol as an Alternative
While methanol is standard, 95% ethanol is listed as an equally viable alternative for the initial pre-wetting of the PVDF membrane before it is moved into aqueous buffers. Researchers may opt for ethanol if they wish to avoid the toxicity associated with methanol during the initial handling of the membrane.
Summary of the Selection Process
• For the initial pre-wetting step: You can use either methanol or ethanol to overcome the membrane’s hydrophobicity. Once wetted, the membrane must be equilibrated in the aqueous transfer buffer.
• For the transfer buffer: Methanol is typically preferred because of its mechanical benefits to the gel and its chemical role in assisting protein binding. However, methanol may be reduced or eliminated when transferring high-molecular-weight proteins (greater than 150 kDa) to prevent them from precipitating and becoming trapped in the gel.
14. What is the difference between native and denaturing PAGE?
The primary difference between native and denaturing Polyacrylamide Gel Electrophoresis (PAGE) lies in whether the protein’s three-dimensional structure and native charge are preserved or disrupted during the separation process.
Denaturing PAGE (SDS-PAGE)
• Mechanism: In denaturing PAGE, typically called SDS-PAGE, protein samples are treated with the anionic detergent sodium dodecyl sulfate (SDS) and heated to unfold them into linear chains.
• Charge and Shape: SDS surrounds the proteins and imparts a uniform negative charge, neutralizing differences in their native shape and charge.
• Separation Basis: Because all proteins acquire a constant charge-to-mass ratio, they migrate through the polyacrylamide mesh toward the positive pole based exclusively on their molecular weight.
• Reducing Agents: Chemical reducing agents like DTT or β-mercaptoethanol are often added to disrupt internal disulfide bonds, ensuring the protein is reduced to its primary monomeric structure.
Native PAGE
• Mechanism: Native PAGE separates proteins in their original, folded state without the use of denaturing detergents or heat.
• Separation Basis: Migration in a native gel is determined by a combination of the protein’s electric charge, isoelectric point (pI), and 3D structure.
• Sample Preparation: This method utilizes mild lysis buffers that exclude detergents to preserve the protein’s conformational integrity and enzymatic activity.
Impact on Antibody Detection
The choice between these methods often depends on the antibody being used for detection:
• Conformational Epitopes: Some antibodies only recognize epitopes dependent on a protein’s 3D shape; these antibodies are ineffective if the protein has been denatured. Native PAGE is required in these instances.
• Linear Epitopes: Antibodies that recognize a linear or continuous sequence of amino acids generally perform better with denaturing PAGE, as the unfolding process can actually expose epitopes that were previously hidden within the folded protein.
15. Which detergents best preserve a protein’s 3D structural motifs?
To preserve a protein’s 3D structural motifs (conformational epitopes), researchers must avoid potent anionic detergents like sodium dodecyl sulfate (SDS) or lithium dodecyl sulfate (LDS), which are specifically used in standard Western blotting to unfold proteins into linear chains and eliminate secondary and tertiary structures.
According to the sources, the following strategies and detergents are used when maintaining a protein’s native 3D shape is critical:
1. Exclusion of Detergents
For antibodies that only recognize epitopes dependent on a protein’s 3D shape, the sources state that mild lysis buffers that exclude detergents are preferred. This prevents the loss of conformational motifs that would otherwise occur during standard sample preparation.
2. Non-ionic Detergents
When detergents are necessary for solubilization or washing without complete denaturation, non-ionic detergents are utilized. These are less harsh than anionic detergents and include:
• Tween-20: Often added in minute percentages (0.1%) to blocking and wash buffers (such as TBST) to reduce nonspecific interactions while remaining mild enough for many applications.
• Triton X-100: Another non-ionic detergent used in blocking solutions and for removing bound antigens from membranes.
3. Detergents for Renaturation
If a protein has already been denatured, Triton X-100 can be used to help it reacquire its 3D structure. For example, in zymography (activity gel electrophoresis), researchers remove SDS by washing the gel in 2.5% Triton X-100, which allows the enzymes to renature and regain their functional 3D conformation.
4. Preservation of Specific Motifs
While heat and SDS disrupt most higher-order structures, some structural motifs created by disulfide bonds can be insensitive to heat-mediated denaturation alone. To preserve these specific motifs, researchers must omit reducing agents (such as β-mercaptoethanol or DTT) from the sample buffer; without these agents, disulfide bridges remain intact, even if the rest of the protein is partially unfolded.
16. How do you choose between non-ionic and anionic detergents?
Choosing between non-ionic and anionic detergents in western blotting depends primarily on whether you need to denature proteins for size-based separation or preserve their native 3D structure for specific antibody recognition.
1. Choosing Anionic Detergents (SDS and LDS)
Anionic detergents, such as sodium dodecyl sulfate (SDS) and lithium dodecyl sulfate (LDS), are chosen when the goal is to separate proteins based strictly on their molecular weight.
• Mechanism of Action: These potent detergents unfold proteins into linear chains and surround them with negative charges, creating a uniform charge-to-mass ratio. This neutralizes differences in native shape and charge, allowing migration through a gel to occur solely as a function of size.
• Suitability for Linear Epitopes: Anionic detergents are preferred when using antibodies that recognize linear or continuous epitopes, as the unfolding process can actually improve binding by exposing epitopes previously hidden within the protein’s core.
• Limitations: These detergents disrupt secondary and tertiary protein structures. Additionally, they can interfere with certain protein quantification methods; for example, the Bradford assay is relatively intolerant to high concentrations of detergents.
2. Choosing Non-ionic Detergents (Tween-20 and Triton X-100)
Non-ionic detergents are much milder and are chosen to minimize non-specific interactions without significantly altering the protein’s structure.
• Mechanism of Action: They help remove loosely bound proteins and reduce background noise during the washing and blocking stages.
• Common Applications:
◦ Tween-20 is typically added in minute percentages (0.1%) to wash buffers like TBST (Tris-buffered saline with Tween-20) to ensure specific antibody-antigen binding while clearing away unbound probes.
◦ Triton X-100 is used to remove bound antigens from membranes or to facilitate renaturation. In zymography, for instance, washing a gel in Triton X-100 removes SDS, allowing enzymes to regain their functional 3D conformation and activity.
3. Decision Based on Epitope Recognition
The most critical factor in choosing a detergent is the nature of the antibody-antigen interaction:
• Conformational Epitopes: If an antibody only recognizes a protein’s 3D shape, anionic detergents must be avoided. In these cases, researchers use mild lysis buffers that exclude anionic detergents to keep the protein in its native state.
• Disulfide Bonds: Some complex structural motifs are held together by disulfide bonds. While anionic detergents denature the overall shape, these specific chemical bonds can remain intact unless a reducing agent (like β-mercaptoethanol or DTT) is added alongside the detergent.
4. Summary Table for Selection
| Detergent Type | Examples | Primary Use in Western Blot | Effect on Protein Structure |
|---|---|---|---|
| Anionic | SDS, LDS | Sample preparation for SDS-PAGE | Denatures and unfolds proteins; adds negative charge |
| Non-ionic | Tween-20, Triton X-100 | Washing, blocking, and renaturation | Preserves or restores 3D structure; reduces background |
17. When is it better to omit reducing agents like DTT?
In western blotting, it is better to omit reducing agents like dithiothreitol (DTT) or 2-mercaptoethanol ( β-mercaptoethanol) when the goal is to preserve the higher-order structural motifs of a protein that are held together by disulfide bonds.
According to the sources and our conversation history, you should omit these agents in the following scenarios:
1. To Ensure Antibody Recognition
The most critical reason to omit reducing agents is if the antibody recognizes a conformational epitope. While heat and SDS denature most secondary structures, intra- and inter-chain disulfide bonds create complex structural motifs that may be insensitive to heat-mediated denaturation alone.
• If the antibody’s target epitope is located within or depends on these chemical bonds, disrupting them with DTT can alter or destroy the binding site, rendering the antibody ineffective.
• As noted in our conversation history, antibodies that recognize linear epitopes generally perform better under reduced conditions because unfolding the protein can expose those buried sequences; however, for antibodies sensitive to 3D shape, non-reducing conditions are essential.
2. To Study Multi-subunit Complexes
Reducing agents are used specifically to cleave disulfide bonds. If you omit them:
• Inter-chain disulfide bonds remain intact, allowing you to visualize proteins that exist as dimers, trimers, or larger quaternary complexes.
• In certain specialized techniques like 2-D gel electrophoresis, samples can be run under nonreducing conditions in the first dimension to keep subunits together before being reduced in a second dimension to break them apart.
3. To Preserve Specific Structural Motifs
Without the addition of DTT or 2-mercaptoethanol, proteins containing disulfide bonds partially retain their tertiary structure. Researchers may choose to omit these agents to observe the protein in a state that is closer to its native conformation, even if SDS is still present to provide the negative charge necessary for migration.
Practical Considerations
It is important to note that if reducing agents are omitted, the protein may not migrate according to its true molecular weight. Because the protein remains partially folded, its frictional resistance in the polyacrylamide mesh changes, which can result in the protein appearing at an unexpected position on the gel compared to a fully linear, reduced sample.
18. Does Tween-20 affect antibody-antigen binding specificity?
In the context of western blotting, Tween-20 is a mild non-ionic detergent that plays a vital role in ensuring antibody-antigen binding specificity by managing the “noise” or non-specific interactions that can occur during the immunodetection phase.
Based on the sources, Tween-20 affects specificity and analysis in several key ways:
1. Reduction of Non-specific Interactions
The primary function of Tween-20 is to reduce non-specific interactions between the antibodies (both primary and secondary) and the membrane or other immobilized proteins. Because blotting membranes are designed for high-affinity protein binding, antibodies—which are themselves proteins—can easily stick to any unoccupied area of the membrane.
• Mechanism: When added to wash buffers (like TBST) or blocking solutions, Tween-20 acts as a surfactant that helps remove loosely bound proteins and prevents antibodies from adhering to the membrane through hydrophobic or charged interactions.
• Outcome: This process ensures that the primary antibody is only able to bind to its specific target antigen, thereby reducing background noise and eliminating false positives.
2. Maintenance of Protein Conformation
As discussed in our conversation history, choosing a detergent involves balancing the need to clean the membrane with the need to preserve the target protein.
• Unlike anionic detergents like SDS (sodium dodecyl sulfate), which are potent denaturants used to unfold proteins for size-based separation, non-ionic detergents like Tween-20 are mild.
• Tween-20 is used at a minute percentage (typically 0.1%) specifically because it is gentle enough to minimize non-specific binding without disrupting the actual antibody-antigen bond or significantly altering the protein’s conformation.
3. Role in Wash Buffers (TBST)
Tween-20 is a standard component of Tris-buffered saline with Tween-20 (TBST), which is used repeatedly throughout the immunodetection process.
• Washing Strategy: The membrane is typically washed multiple times in TBST after both primary and secondary antibody incubations. These washes are critical for minimizing background signal and ensuring analytical accuracy.
• Concentration: A common recipe for TBST involves adding approximately 500 μL of Tween-20 to 1 L of buffer (roughly 0.05% to 0.1% concentration).
4. Potential Signal Interference (Over-Washing)
While Tween-20 improves specificity, its use must be carefully monitored. The sources note that while washing is essential for a clean signal, the membrane should not be washed for an excessively long time, as this can eventually reduce the specific signal or wash away the primary antibody-antigen complex.
In summary, Tween-20 is essential for binding specificity because it clears the “interference” of non-specific binding, allowing the true antibody-antigen interaction to be visualized clearly.
19. How do housekeeping proteins help normalize western blot results?
Housekeeping proteins help normalize western blot results by serving as internal controls to ensure that variations in the final signal are due to biological differences rather than technical errors. Because Western blotting is a semi-quantitative technique, several factors—such as unequal sample loading, variations in protein extraction, or inconsistent transfer rates across lanes—can compromise the accuracy of the data.
Housekeeping proteins facilitate normalization through the following mechanisms:
• Ensuring Equal Loading: By probing for proteins that are ubiquitously expressed and generally remain constant across different experimental conditions—such as β-actin or α-tubulin—researchers can confirm that equivalent amounts of total protein were loaded into each lane.
• Correcting for Transfer Efficiency: These controls allow researchers to check the uniformity of protein transfer from the gel to the membrane, accounting for any accidental loss of sample or “washout” that may have occurred during the blotting process.
• Statistical Assessment: Normalization is achieved by comparing the band density (intensity) of the target protein to that of the housekeeping protein in the same sample. This ratio allows for a statistical assessment of relative protein abundance across different samples and experimental groups.
• Dual-Probing Capability: Modern fluorescence-based detection systems allow researchers to probe for the target protein and the housekeeping protein simultaneously using distinct fluorophores, which enhances the precision of the relative quantification.
While the use of housekeeping proteins is the classical method for normalization, the sources note that researchers are increasingly moving toward total protein staining (using techniques like Ponceau S or stain-free technology) as a superior strategy to correct for technical variations and ensure the analytical validity of the blot.
20. Why is total protein staining often superior to housekeeping controls?
Total protein staining (TPS) is considered a superior normalization strategy to the classical use of housekeeping proteins (HKPs) because it provides a more comprehensive and accurate representation of the actual protein content on a membrane.
1. Comprehensive Validation of Transfer
A primary benefit of total protein staining is that it allows researchers to visualize all proteins successfully transferred to the membrane.
• Uniformity Check: TPS allows the user to check the uniformity of the protein transfer across the entire membrane, rather than relying on the transfer of a single protein band.
• Detection of Errors: This practice ensures accurate correction for the total protein amount even in cases of technical errors or incomplete transfers, which might be missed if only a single HKP is monitored.
2. Enhanced Normalization Accuracy
While housekeeping proteins (such as β-actin or α-tubulin) are used as internal controls to confirm equal loading, TPS offers multiple analytical advantages for normalization.
• Actual Protein Amount: Normalization via TPS is based on the actual protein amount per lane rather than a proxy protein.
• Reduced Quantitation Bias: Using a single HKP assumes that its expression is perfectly stable and that its transfer efficiency perfectly mirrors that of the target protein. TPS avoids these assumptions by using the entire protein population in a lane as the normalization factor.
3. Strategic Advantages in Workflow
• Pre-blocking Visualization: To avoid signal noise, total protein staining is typically performed before the blocking step, providing an immediate visual metric of the blot’s quality.
• Technological Variety: Researchers can choose from at least seven different approaches for TPS normalization, including Ponceau S, stain-free techniques, Sypro Ruby, and Epicocconone, allowing the method to be tailored to the specific imaging system used.
• Signal Linearity: As noted in our conversation history, TPS can be more reliable than single HKPs because the signals generated by detection for individual proteins are often nonlinear across concentration ranges, making them less ideal for modeling concentration than the aggregate signal of a total protein stain.
Comparison Summary
| Feature | Housekeeping Proteins (HKP) | Total Protein Staining (TPS) |
|---|---|---|
| Reference Point | A single, ubiquitously expressed protein band. | All proteins transferred into the lane. |
| Error Detection | May not reflect incomplete transfer of other molecular weights. | Corrects for technical errors and incomplete transfers. |
| Analytical Reliability | Classical procedure; currently being phased out in modern standards. | Superior strategy for quantitative western blotting. |
| Procedural Role | Probed concurrently with target protein. | Visualized immediately after transfer and before blocking. |
References
Hnasko TS, Hnasko RM. The Western Blot. Methods Mol Biol. 2015;1318:87-96. doi: 10.1007/978-1-4939-2742-5_9. PMID: 26160567.
Kurien BT, Scofield RH. Western blotting: an introduction. Methods Mol Biol. 2015;1312:17-30. doi: 10.1007/978-1-4939-2694-7_5. PMID: 26043986; PMCID: PMC7304528.
Mahmood T, Yang PC. Western blot: technique, theory, and trouble shooting. N Am J Med Sci. 2012 Sep;4(9):429-34. doi: 10.4103/1947-2714.100998. PMID: 23050259; PMCID: PMC3456489.
Zubair M, Launico MV. Western Blot: Principles, Procedures, and Clinical Applications. [Updated 2025 Dec 1]. In: StatPearls [Internet]. Treasure Island (FL): StatPearls Publishing; 2025 Jan-. Available from: https://www.ncbi.nlm.nih.gov/books/NBK542290/
https://en.wikipedia.org/wiki/Western_blot
https://www.genome.gov/genetics-glossary/Western-Blot
https://www.nature.com/scitable/definition/western-blot-288/
Related posts:
 Molecular Scissors: An Introduction to Restriction Enzymes
 Artificial Chromosomes: YACs, BACs, MACs, HACs
 CRISPR Series: Unlocking the Code: A Beginner’s Guide to CRISPR-Cas9
 Understanding the Types of Cloning: A Comprehensive Guide for Beginners
 Mastering Molecular Cloning: A Comprehensive Guide to Essential Enzymes in Biotechnology